To Balun or Not to Balun, this is the question?
Like Ford vs Holden, Canon vs Nikon or Yaesu vs Icom; the world is divided into two camps on how best to connect a resonate wire antenna to a bit of coax.
Until now, my dipole had been direct connected. and this had worked as intended, but i was curious of any difference a Balun would make, so I started looking into what would be required and needed to make one that was lite and easy to use for sota activations.
After much googling and a question on the sota email forum, i found a number of sources that showed how to make a 1:1 Current Balun and decided this would be the path I would go do.
ARNSW has a PDF Tutorial (4mb) and the guide I ended up using came from HB9ABX Website, and can be downloaded as a PDF from HERE (1mb).
I decided on RG316 micro coax and a Small Toroid Core, I ended up using a FT114-43 core, as recommended on the above PDF link from HB9ABX . Both items were soured from Mini-kits in Adelaide. and arrived quickly as normal. I took the opportunity to get some more connectors for other projects, my wife shakes her head at my large RF connector collection, wherever has the most connectors wins I constantly remind her!
Start with a length of Coax, for the RG316 coax, you need around 45cm free to wind the Toroid up. You should see around 12-15 turns on the core. depending on your care and loop size, the greater amount of turns, the wider the Balun will perform (the theory says), but it also has a tipping point of saturation. Which can increases the loss of the core. Less winds will limit the bandwidth, you can find webpages and information around to help model different cores and coax/wire/turns and see what will perform best for you.
You need to wind the coax as shown in this photo
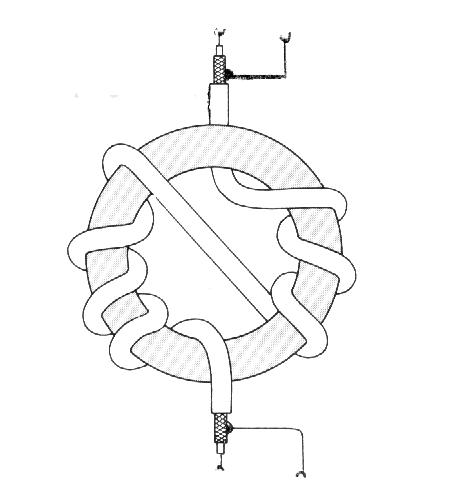
And my effort, start with the RG316 cable, and cable tie bottom end in place.


Wind the coax around the core and then cable tie the left hand side at the top of the core, cross over and start on the reverse side.

Then repeat the right hand side winding back to the top of the core, and cable tie at the top.


With the core done, I moved onto the mounting arrangement, I decided to try and engineer a mount using core flute for portable sota work. I had purchased some RG316 BNC connectors and worked this into the core flute making a mount and centre point for dipole wire.


I installed the connector into the core flute on a little tab, to allow quick coax connection. Then added some cable ties to mount onto the squid pole.


I then measured out some legs and connected them to the core centre. In no time, I had a new 7Mhz / 40m dipole with 1:1 Balun! A quick weight on the house scales, and the centre/core, 20m of wire (for the dipole legs) and 20m of cord for tying off the dipole, and the core flute winders showed 173grams.

So, how does it work, i had a chance to use it the other day in the local park for a quick activation on the Pirate Contest, and without any tuning and trimming of the wire (its a fraction long with vswr at 3:1, a peak at 6.4Mhz, it works a treat!, (i used my elecraft T1 ATU to fix it for my 40m contacts), My next job is to tune/trim the wire to make it resonate! it shouldn’t take much!


Pingback: Tuning the dipole using the 1:1 Balun - VK3BQ
Good info and can be hard to find. Thanks W8GMF
Thank you for the good info.
Thanks for the good info, photos, and references. Just what I was looking for for some SOTA portable operations here.
George, N9DXP
This was a very funny article. All the things you said resonate here also. The wife shaking here head……. It’s not just me.
why so many windings ??
i see many sites say four each side, so eight total ?
yours is thirteen, six one side seven the other ?
does the amount of turns matter ??
im not 10% sure, I copied a design I found online, and it seemed to work?
ok well i built mine and yes it is 1:1 up to around 14 MHz then it becomes useless..
yet other commercial 1:1 i have are 1:1 up to 50 MHz..
so i need to look more in to why thirteen turns is not right.